Showing posts with label Helmar Craft & Hobby PVA. Show all posts

Wednesday, October 30, 2013

Helmar is spider-licious!

Happy Hallow Eve!

A short, quick and easy post for Helmar today!

I love making little spider web doilies for my Halloween decor! 
Take a piece of wax paper and "draw" your spider web design on top of the wax paper with your Helmar Craft & Hobby PVA Glue.

After "drawing" your spider web pattern, dump a whole lot of glitter on top making sure all the glue is covered. Set it aside to dry. I usually leave mine alone for a couple of days just to make sure that even the thickest part of the "strands" are completely dry.

Next, peel off your web and take it outside to spray with Helmar Crystal Kote Gloss Varnish to seal all that wonderful glittery goodness so that you don't leave glitter everywhere...unless you like that...lol

Next, every web needs a glittery spider to go along with it, after all who's going to guard the treats? I "painted" the plastic spider first with Helmar Craft & Hobby PVA Glue with a paintbrush ( you can use your finger too ) !

Next, the glitter application! ( that is one glittery mess!! )

And then comes the sealing process!

Last but not least,  a few pearls for eyes....all the better to see with you with!

Monday, October 28, 2013

Paper Playtime - google eyes

I love googlie eyes, they just make me smile and can deliver even the snarkiest statements in a friendly and fun way, like this birthday tag saying, "you're how old? "...lol

I used my paper which had a cute little monster to create a balloon shape and added the goggle eyes to it and some twine for a bow.

I filled in the negative space with glossy accents after filling in the centers of the A's....( not sure what this says about me, but I don't deal with negative space very well, I guess I want happy space )....::eye roll::

Reminisce white pen
CardsTv - stamp
Ranger - glossy accents
Really Reasonable Ribbon - twine
Cricut - Stretch Your Imagination, p. 60

also entering my birthday tag in:
Seize the Birthday - Anything Goes

Sunday, October 27, 2013

Sundays with Sandee


Hi everyone, here is my very first art journal page using the awesome Dylusions Journal.

 I am finally taking some "me time" and just making pages for me to enjoy and not sell. If you want to see what I make and sell you can click on the tab at the top of my blog where it says "Mixed Media signs at the Art MoB"....but this....this is for me! As a matter of fact, if you look through my signs you will find one that is similar to this journal page, it was one that I would have liked to have kept for myself!

I thought this quote, which is one of my favorites would fit the theme of the journal. 
I added this to the front chipboard piece, it's the inside cover, when you open up the journal. 
( I'll wait until the journal is completed before working on the outside cover. ) 

Here is the foam brush that I show you in the video over at Frosted Designs, if you want to watch it, then please follow this link.

Here are the scissors, pencil and brushes that I made using the exact same technique.
I enjoy adding inspirational words to the tools.

I used an eclectic lettering mix; of stickers, handwriting and cut by my Cricut.
( big hint: do NOT use coconut oil on your hands and then touch your work, because the Sakura glaze pens will not stick!! Hence the wobbly looking "great"...lol  rolling eyes at myself, this is what I get for being a touchy/feely person when it comes to my art...)

Sakura - glaze pens, waterproof pens
Reminisce white pen 

I hope you take this "journey" with me and we can share our journal pages on the Frosted Designs Facebook page!


Monday, October 21, 2013

May Arts - Halloween Challenge

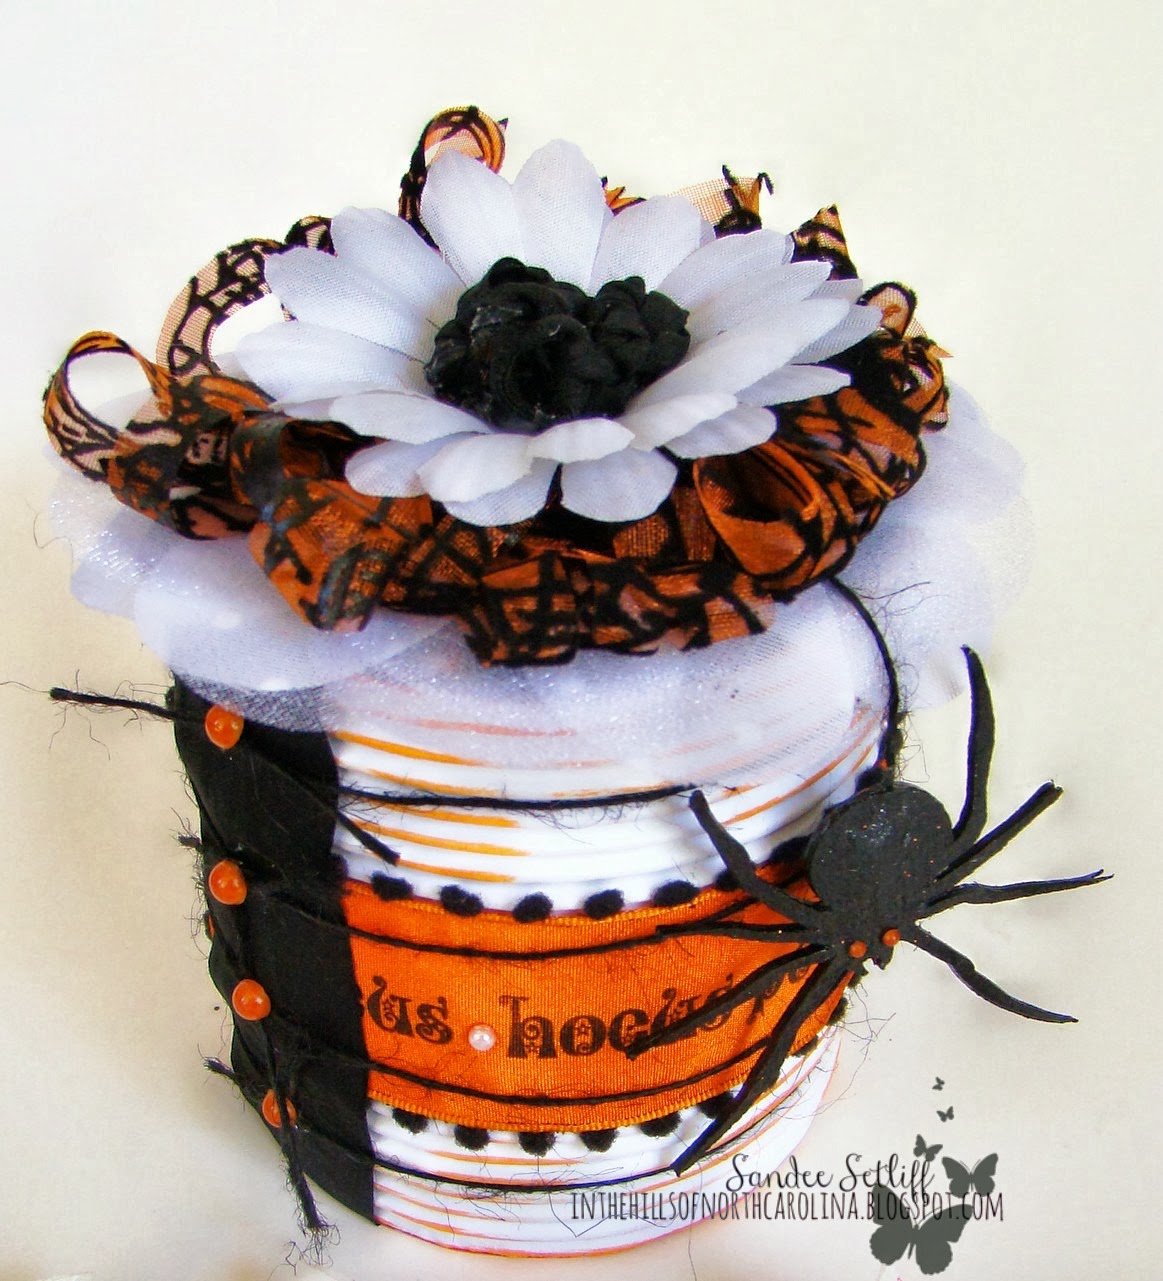
I have to say that I was very excited to be in the top 20 that gets to compete in the Halloween Challenge over at May Arts. It's an honor to be chosen and I sincerely hope I hold my end up because there are some AWESOME ladies over there designing some amazing projects with ribbon. We got to choose 4 ribbons to work with, these were my choices:
http://www.mayarts.com/halloween-craft-challenge/
I made the center of my flower by knotting the black silk ribbon repeatedly until it formed the size I needed. I stamped 'hocus pocus' onto the wide orange ribbon accenting between the words with white pearls, I just love the tiny pom pom trim on it!!
The sheer spider web ribbon was looped into a big bow and then shredded for texture. The fuzzy black burlap string was wound around the box and knotted on the sides with orange pearls accenting the knots.
A big dangly spider hanging from the burlap string guards the treats within!


Cricut Craft Room - free cut -spider
BugBites - Magic Spells stamps
StazOn - ink
Tim Holtz - grunge paper
Helmar - 450 Quick Dry Adhesive, Craft & Hobby Glue, Gemstone Adhesive
Frosted Designs 2013 October Mixed Media Kit - 
( Deco Arts - Orange, black paint, Fancy Pants corrugate paper )

Entering my Halloween treat box in:
Anything but a Card - #28 Orange and Black
Craftin' Boutique - #12 Halloween

Monday, October 14, 2013

Guest Designer - Craft It Up & Link It Up Linky Party


I am posting today as a guest designer for Craft It Up & Link It Up Linky Party hosted by Tara of Craftin Desert Divas! Every other Monday will mark the beginning of a new semi-weekly linky party and you could win fabulous prizes!!

This linky party theme is Halloween!!! 


The sponsors are Too Cute by Jessica - $20 giftcard
and
Stinkin Cute Paper Piecings - $25 giftcard . 

The more you link up, the better chance you have to win.  Visit Craftin Desert Divas for all the rules and to play along.


Here is what I created for this linky party....A party cup made from a recycled fruit cup from the grocery store.
I love re-cycling!
 So many things are 'old' products, like the embossed scallop die, the purple metallic fiber ( yes, I do collect stuff like that just for certain occasions like Halloween!! ) and the orange magic mesh.
It's now sitting on the Art MoB counter offering little treats to all our customers!


I love embellishing my die cuts with a little glitter and fiber and embossing around the edge of the moon.
Cutting tiny strips into the broom add more fun detail!

Cricut - Happy Hauntings p. 34 ( witch )
Paper Trimmings p. 61 ( moon )
Ranger - stickles
fiber,mesh, paper, sticker letters - from old stash
Helmar - Craft Glue ( awesome for adhering things to plastic! )
Helmar - Craft & Hobby PVA Glue

Hope you will Craft It Up & Link It Up!!!

also entering this in:
Little Scrap Pieces - Fun Friday Linky Party
All That Stickles - Halloween Linky Party
Creative Inspirations - Inspired by Halloween

Monday, October 7, 2013

Stuck on Helmar

Hi everyone, it's Sandee here with my first Helmar Design Team post, bringing you a easy gift idea for the upcoming holidays. A sewing box, made sew easy with Helmar Adhesives.

 I love to re-cycle, up-cycle and re-purpose just about anything and today my project begins with a discarded ribbon card board tube and a foam insert that you find in your package of brads.  So the first thing I did was to paint the cardboard and cut the foam into a circle.

Using Helmar's Craft & Hobby PVA glue I attached the paper to the cardboard tube. This glue truly grabs hold and secures the paper, even along a round shape.

Then I added ribbon around the box, leaving one side open. You need a strong glue like Helmar's Fabric Glue to make sure the ribbon holds up to the opening and closing of the box.


I used Helmar's Foam Glue to attach the ribbon onto the foam.


I attached the foam pin cushion to the top of the box, again with Helmar's Foam Glue.

There are 12 thin layers of flowers secured with Helmar's Fabric Glue and a dollop of Helmar's 450 Quick Dry Adhesive which holds the gold bead in the center of the flower and holds the flower onto the foam base.

I love that Helmar's 450 Quick Dry Adhesive dries to a crystal clear finish because, sometimes, what you don't see is the most important part of your artful creation!

Maya Road - Butterfly stickpin
Little Yellow Bicycle - woodedn stickpins
May Arts - ribbon, 421-05-33

Tuesday, October 1, 2013

Deco Art Blogger - Halloween wall hanging

My first Deco Arts Blogger post!!

I wanted to create a Halloween wall hanging using a Gelli print background and I wanted to experiment with some different paints to see how they worked together.

Deco Art Paints:
Americana Neons - Thermal Green
Dazzling Metallics - Royal Ruby
Americana Frost Gloss Enamels - Black
Paper Effects -Black Pearl
Bright Accents - Gloss Acrylic, black


The metallic and neon paint did exceptionally well together. The metallic subdued the neon a little bit but still leaving enough of it to pop out without being obtrusive to the overall design. The frost glass paint applied well but was a little harder to clean off the gelli plate, but still highly doable.

I fell in love with the Paper Effects Writer with it's dual tip. The fine tip was excellent for writing words and for fine detailing. I did make sure to clean the tip well before storing it.

I used the Paper Effects 2 ways along the border. I doodled a fine line and squiggly marks using the tip, and went back and added larger drops using just the bottle's tip. I also love my little spider, I set him up on the Helmar's Liquid Scrap Dot Adhesive for some dimension and used glossy accents over his body. The stem of the broom was painted with the Neon Green and Deco Arts Bright Accents in black.


This great little wood accent from Prima was balanced on top of the broom using Helmar Liquid Scrap Dots. This is a favorite use of this specialty glue, fixing odd pieces in hard to hold areas. I love, love, LOVE this stuff!

I used the neon green on the broom by brushing it lightly on top.

I think one of the favorite parts about the gelli print background was using my kitchen utensils ( better used here than in the kitchen! Can you tell I don't cook much any more?) It's small plastic thingy ( technical term ) with sharp edges that I raked through the paint in a wavy pattern. It gave me a defined writing line to follow which I appreciated since I always have a problem keeping my lines straight!

Products used and enjoyed:

Helmar 450 Quick Dry Adhesive, Liquid Scrap Dots, Craft & Hobby PVA Glue
Prima - Anna Marie Wood Embellishment
Gelli Plate 12x 14
May Arts - black twine, ribbon
Jillibean - green twine
Cricut - Happy Haunting, p. 54

entering my 6X12" wall hanging in:
 ( a place to link up those gelli prints!! )
Die Cuttin Diva's - #134 Fall Colors
Craftin Desert Divas - Anything with a Sentiment #16 Linky Party
Craftin Boutique - Anything Halloween Challenge #9 
2 Creative Chicks - Spooktacular Linky Party