Showing posts with label Helmar 450 Quick dry Adhesive. Show all posts

Monday, March 24, 2014

Shadow box mini album with Helmar

I'd love for you to visit me over at the Helmar blog, I've been playing with my glue again and I discovered a fun way to use glitter with the Helmar Quick Dry Adhesive when I was making my Prima inspired shadow box album. 


Over on the Helmar blog you get a step out tutorial on how I used to embed trinkets into my glittered glue, but over here on my blog I have a very short slide show on the album itself.

Enjoy!

Wednesday, March 12, 2014

Frosted Designs Kit Challenge

Sooooooooo....if you happen to visit my blog then you might know that our March kit is out, called A Moment in Time, which is gorgeous!! And to think kits like this can be delivered right to your front door! Does life get any better?
A Moment in Time

Which brings us to the Kit Challenge !!

We are going to stick with a recipe as it gives you, the subscriber, more control over which items you would like to use.  Remember: ANY TYPE OF PROJECT is acceptable so long as you use at least three of the following items from the kit:

~ Black Background (Can be solid cardstock!)
~ One Word Title 
~ Chipboard or Wooden Die-Cuts (At least ONE piece!)
~ Flowers (At least ONE!)
~ Ribbon

Fell free to use other items as you normally would...  Just be sure to include three of the above on your project to be entered in to win a fabulous prize! Check out the Frosted Designs Blog for details!

And here is what I created using: 
1. black background
2. wooden die-cut
3. flower


other products used:
Ranger Distress marker, Crackle Paint

Wednesday, March 5, 2014

Helmar

My project for Helmar today is this sweet as sugar fairy frame. Please feel free to visit their blog for all the details ♥


also:
Little Yellow Bicycle - stick pins

Interested in joining a fabulous design team? 
Check out the Helmar site for all the details and while you're over there I'd love for you to leave me a comment! ♥

Wednesday, February 12, 2014

Helmar - a snarky Valentine I am ♥

I hope you weren't expecting a mushy Valentine project from me, lol 
How about snarky?
If you want the deets on this plaque, then please visit the Helmar blog

Helmar, Helmar, Helmar, baby!!
Frosted Designs January kit - Love is in the Air 
Want 2 Scrap -pearls
Quick Quotes Powder Puff  - ink

Friday, January 31, 2014

A Royal Highfalutin Contest

Calling all Queens, Divas and Princesses out there...yes you!

I am declaring 2014 a Royal Year, and to kick it off we are having a crown party. 

This event is sponsored by:

So practice your Queenly wave, and make your own 3-D crown. You can make any kind of crown as long as it is a 3-D project. Want to earn extra chances to win? Then post a picture of you wearing it and I'll put your name in the hat for 5 extra chances! It's as simple as that!

 You can have a chance to win some 

Helmar 450 Quickdry Adhesive and Gemstone Adhesive
Cardboard roll
Deco Arts Metallic 
Ranger - stickles
misc. pearl strand


( You can go HERE to see what became of my crown )

Helmar Stiffener and Draping Liquid
Helmar Gemstone Adhesives
misc. lace
Want 2 scrap - pearls

This contest will end on January 31st, so that should give everyone plenty of time to get their royalty on! You can enter as many times as you wish, as long as they are a new entry each time,no backlinking allowed. So blog about your crown and make sure you link up to that post ( and not your entire blog ) so we can all visit and leave you you some Queenly ohh's and ahh's!

 I want to thank Jeanette from the Helmar Design Team for giving us this fun and whimsical inspiration and for Helmar for giving me a prize to offer! 


We can’t all be a princess…someone has to sit on the curb and clap as I go by!


Thursday, December 26, 2013

paraphernalia: noun

accessory items 

--------------------------------------------------------------------------------------
You got some time to enter the Frosted Designs challenge: My Favorite Things
You need to use at least 3 of things that are underlined from the song from The Sound of Music.
I used, brown paper ( branch ), wings ( bird ) and silver white ( flower )


I used the Printshop cardstock stickers to create a background, which I separated the thanks and outlined it so it would stand out. The printed background paper came from the November Mixed Media Kit and the eye is a Maya Road resin flower.

other assorted paraphernalia:

The chipboard bird was gifted to me
Cricut - French Manor ( branch ), p. 39
Helmar - 450 Quick Dry Adhesive

Also entering my thank you card in:
Cute Card Thursday - #301 Anything Goes
Challenges 4 Everybody - #36 Anything Goes

Monday, December 16, 2013

May Arts - Christmas Challenge


Our stockings hang upon a wall.
We have no fireplace at all!
You see the problem is quite clear.
Santa, how will you get in here?


We heard a legend. Is it true?
Of magic only you can do.
We'll leave out any plain old key,
and mark it "Santa" so you can see.


Your magic makes the key fit right,
so you can get inside that night.
Thank you Santa, here's our key.
The milk and cookies are on me!


Helmar - 450 Quickdry Adhesive
Cricut - French Manor
May Arts Ribbon

Entering Santa's Magic Key in:

Fantabulous Cricut - #191 Anything but a Card, holiday edition
Anything but a Card - #30 Anything Goes with a Holiday Twist

Thursday, December 5, 2013

Pretties

Using the plural noun pretties to refer to dainty things goes back at least to the 1700s.
Some early uses refer to toys and jewelry, but the word was also applied to women's lingerie.
By all rights it should be a lovely word, but because of its association with the Wicked Witch of the West ("I'll get you, my pretty!"), using it at a lingerie store today might sound a bit creepy.
-------------------------------------------------------------------
Fantabulous Cricut - #189 Beyond red and Green
Fab 'n' Funky -#196 A Touch of Frost
Challenges 4 Everybody - #34 Anything Goes
Creative Inspirations - Inspired by Christmas

This is a gift card holder, the gift card slides in and out of the top of his hat with the card opening up so that you can write your sentiment inside :)

I stacked 3 plastic snowflakes on each other ( love my Helmar's 450 for adhering pieces like that together! ) and then added a pearl on top. The whole piece is popped up with some Liquid Scrap Dots for some dimension.

Helmar- Liquid Scrap Dots, 450 Quick Dry Adhesive
Cricut - Winter Woodland, p. 46
 ( taken to the CCR to create the card shape and to separate the hat from the scarf. )
Ranger - stickles
Reminisce - white pen

Wednesday, December 4, 2013

Helmar - Summer

It was kinda surreal to be designing a summer themed project right after our first snow fall of the year and temperatures in the 30's, but nice too. Thinking about the summer for me, means Panama Beach Florida where I vacation every year...beach, sun, swimming...::sigh::

This is my 6 x 12" wall hanging that I designed:

This was my first time experimenting with Helmar's Fabric Stiffener & Draping Liquid and I must say I was delighted and will definitely use this again. Not only was I able to mold it to the shape that I wanted ( I laid a piece of wax paper over my sea horse so that I could mold the curve to match ) but after it is treated, you can paint on it and the inks don't bleed like they normally do when applied to fabric.

After the lace piece had dried, I adhered it with Helmar's 450 Quick Dry Adhesive.

Adding decorations with my Helmar's Gemstone Adhesive:

Enjoying playing with my typography and lettering:

The paper came from the Frosted Designs October Mixed Media Kit, on top of the paper was a lot of layering of these products:


Friday, November 22, 2013

Superfluous

“A kiss is a lovely trick, designed by nature, to stop speech when words become superfluous.”– Ingrid Bergman
: beyond what is needed : not necessary

-------------------------------------------------------------------------------------
Simon Monday Challenge - It's a mystery
Creative Inspirations - Inspired by Anything Goes

I discovered by accident a way to combine the Frosted Designs October and November Mixed Media Paper Kits, if you want to know how then you can click on
or it can just remain a mystery...;)


I've never used an embroidery hoop to create a wall hanging before, seen lots of other people do, so this was a first for me.

Creative Inspirations -Fairy Dust, Copper, Pumpkin,Mint
Deco Art - black
Prima - flower, leaves
Helmar - 450 Quick Dry Adhesive
 K&Co. - butterfly 
ribbon and wheat stalk - misc.

Tuesday, November 19, 2013

Frosted Designs tutorial using inks


I love, love LOVE the 2013 November Mixed Media Kit from Frosted Designs! I made this 6 x 12" wall hanging using most of everything from the kit!

and a short video explaining the different ways I used the inks:
( OK, so I am still learning how to edit my videos, the caption that comes up saying "opps I meant to say Lemon Zest"..is suppose to be when I am showing the Lemon Zest spray but calling it Fresh Lime!!.. All I can say is, it was in the right spot when I saved the changes!!...ugh!! )

I love the Faber Castel watercolor crayons, they sure made coloring in my digital image easy! I love how you can mix the crayon colors together to get a custom look like I did with her hair.

And the Faber Castell PITT pens made coloring in those tight small spaces a snap!

None of my projects are complete without the use of my Helmar products and popping up her head is one of my most favorites...Liquid Scrap Dots!

Faber Castell - Watercolor crayons, Gesso and Pitt Pens
Dilly Beans - #381 Isabella Fairy digital image
Ranger - Dylusion Spray inks, stickles, liquid pearls
Chipboard clouds

Don't forget that you can sign up for the
Mixed Media Paper Kit subscription
and then we play together each month!!
*FREE Dylusions Creative Journal ($24.99 value) with any first time 
mixed media paper kit subscription! 
Offer expires November 30th.

entering this wall hanging in:
Creative Inspirations - Anything Goes

--------------------------------------------------------------------------

Whether you are a journaler, mixed media artist, scrapbooker, or other type of crafter, hand lettering is a visually dynamic way to add textural elements to your work. I have a book review of
Creative Lettering that I'd love for you to check out.
Let's learn to love our handwriting!

Monday, October 21, 2013

May Arts - Halloween Challenge

I have to say that I was very excited to be in the top 20 that gets to compete in the Halloween Challenge over at May Arts. It's an honor to be chosen and I sincerely hope I hold my end up because there are some AWESOME ladies over there designing some amazing projects with ribbon. We got to choose 4 ribbons to work with, these were my choices:
http://www.mayarts.com/halloween-craft-challenge/
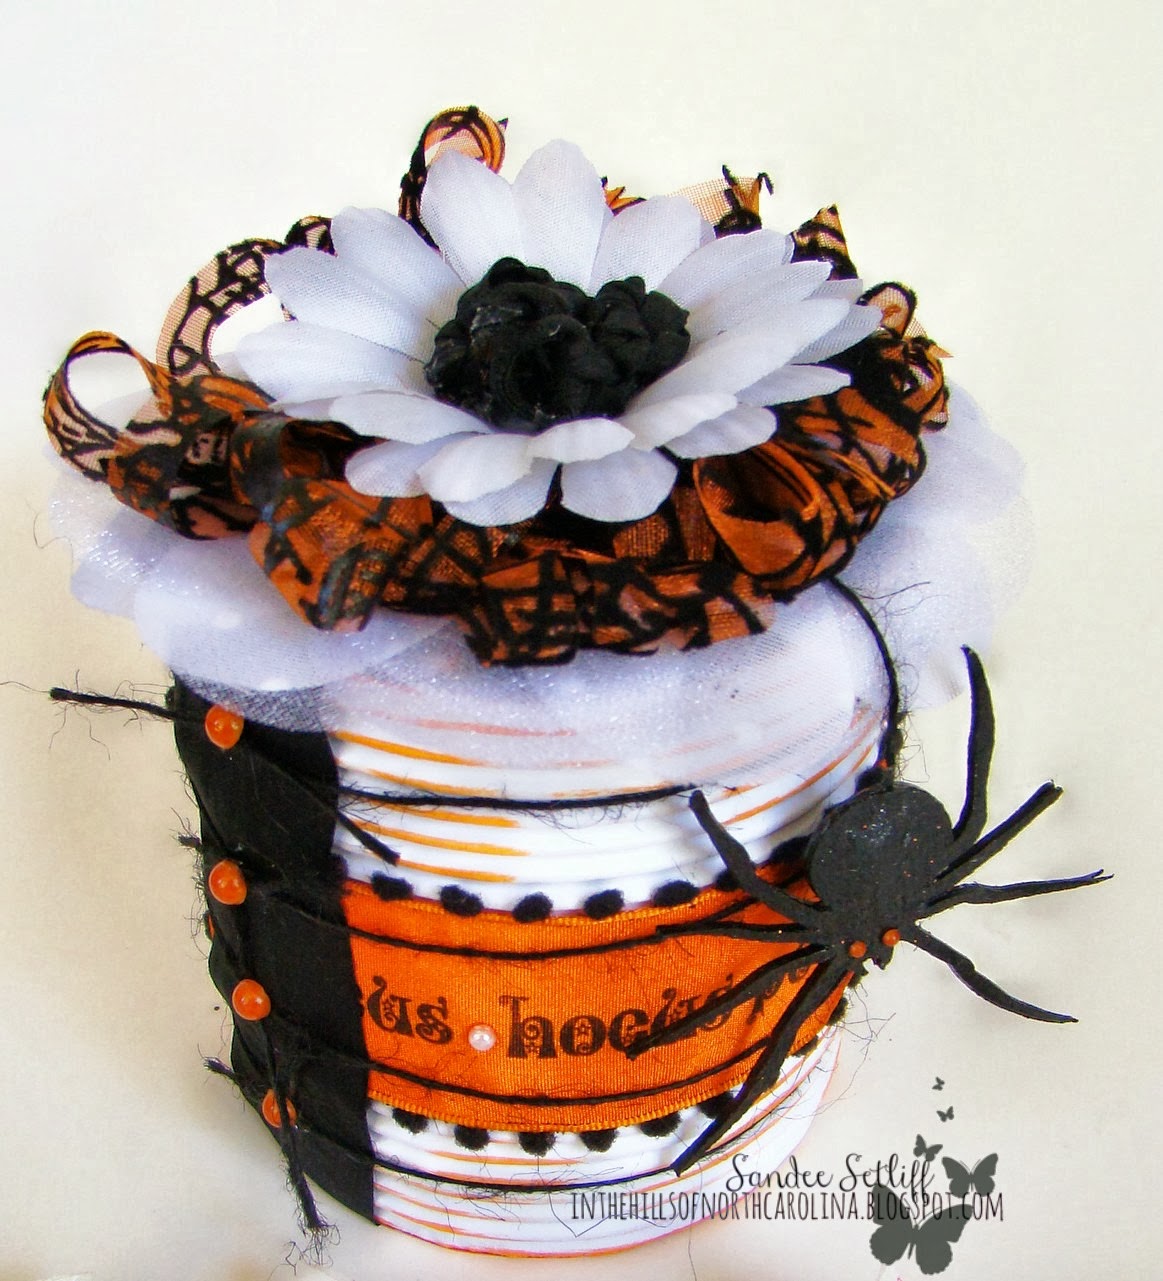
I made the center of my flower by knotting the black silk ribbon repeatedly until it formed the size I needed. I stamped 'hocus pocus' onto the wide orange ribbon accenting between the words with white pearls, I just love the tiny pom pom trim on it!!
The sheer spider web ribbon was looped into a big bow and then shredded for texture. The fuzzy black burlap string was wound around the box and knotted on the sides with orange pearls accenting the knots.
A big dangly spider hanging from the burlap string guards the treats within!


Cricut Craft Room - free cut -spider
BugBites - Magic Spells stamps
StazOn - ink
Tim Holtz - grunge paper
Helmar - 450 Quick Dry Adhesive, Craft & Hobby Glue, Gemstone Adhesive
Frosted Designs 2013 October Mixed Media Kit
( Deco Arts - Orange, black paint, Fancy Pants corrugate paper )

Entering my Halloween treat box in:
Anything but a Card - #28 Orange and Black
Craftin' Boutique - #12 Halloween

Tuesday, October 15, 2013

Deco Arts ~ Gelli plate with stencils

For my Deco Arts post today, I wanted to play around with some different kinds of paints on my Gelli Plate, and I now have a new love, its the Satin Enamel paint and it is a hard, durable paint that flows and levels out to a smooth finish. It is awesome and I LOVE it, you don't have to use much at all, a little bit goes a long way on the gelli. 

I also played around with the Black Frost paint which is a glass paint. Keeping in mind that it is not intended to be used on a Gelli Plate, it did pretty well, and it cleaned off the gelli plate with a little elbow grease, I probably won't use it on the gelli again, but in a pinch it worked out fine. I used it on the chipboard raven too, so you can see the intensity color difference when it is used alone or layered on the gelli. 

You can see where I added the 3D Gloss enamel circles by adding the paint to the dot stencil, giving a nice layered and completely translucent effect.

There you have it, different types of paints from the norm being used.
A glass paint and a wood paint, both worked with different degrees of success.
So, overall, a mix of different paints were used other than the standard acrylic paints, with one paint standing out in a big way, which was the Satin Enamel.
 I loved it so much I have used it on several other projects:
The mixed media wall plate covers and the frame around my bathroom mirror
( Will be giving my lower cabinet the same treatment as the mirror frame. )

Deco Arts products used:
*Satin Enamel - sage green* dark walnut*

other well loved products:
Reminisce sticker letters, white pen

Helmar Krystal KOTE Gloss Varnish
Helmar 450 Quick Dry Adhesive

entering my 6 x 12" wall hanging in:
Craft Room Challenges - Our Feathered Friends
Challenges4Everybody - #31 Anything Goes
Carolyn Dube - October's Colorful Gelli Print Party

Monday, October 7, 2013

Stuck on Helmar

Hi everyone, it's Sandee here with my first Helmar Design Team post, bringing you a easy gift idea for the upcoming holidays. A sewing box, made sew easy with Helmar Adhesives.

 I love to re-cycle, up-cycle and re-purpose just about anything and today my project begins with a discarded ribbon card board tube and a foam insert that you find in your package of brads.  So the first thing I did was to paint the cardboard and cut the foam into a circle.

Using Helmar's Craft & Hobby PVA glue I attached the paper to the cardboard tube. This glue truly grabs hold and secures the paper, even along a round shape.

Then I added ribbon around the box, leaving one side open. You need a strong glue like Helmar's Fabric Glue to make sure the ribbon holds up to the opening and closing of the box.


I used Helmar's Foam Glue to attach the ribbon onto the foam.


I attached the foam pin cushion to the top of the box, again with Helmar's Foam Glue.

There are 12 thin layers of flowers secured with Helmar's Fabric Glue and a dollop of Helmar's 450 Quick Dry Adhesive which holds the gold bead in the center of the flower and holds the flower onto the foam base.

I love that Helmar's 450 Quick Dry Adhesive dries to a crystal clear finish because, sometimes, what you don't see is the most important part of your artful creation!

Maya Road - Butterfly stickpin
Little Yellow Bicycle - woodedn stickpins
May Arts - ribbon, 421-05-33

Tuesday, October 1, 2013

Deco Art Blogger - Halloween wall hanging

My first Deco Arts Blogger post!!

I wanted to create a Halloween wall hanging using a Gelli print background and I wanted to experiment with some different paints to see how they worked together.

Deco Art Paints:
Americana Neons - Thermal Green
Dazzling Metallics - Royal Ruby
Americana Frost Gloss Enamels - Black
Paper Effects -Black Pearl
Bright Accents - Gloss Acrylic, black


The metallic and neon paint did exceptionally well together. The metallic subdued the neon a little bit but still leaving enough of it to pop out without being obtrusive to the overall design. The frost glass paint applied well but was a little harder to clean off the gelli plate, but still highly doable.

I fell in love with the Paper Effects Writer with it's dual tip. The fine tip was excellent for writing words and for fine detailing. I did make sure to clean the tip well before storing it.

I used the Paper Effects 2 ways along the border. I doodled a fine line and squiggly marks using the tip, and went back and added larger drops using just the bottle's tip. I also love my little spider, I set him up on the Helmar's Liquid Scrap Dot Adhesive for some dimension and used glossy accents over his body. The stem of the broom was painted with the Neon Green and Deco Arts Bright Accents in black.


This great little wood accent from Prima was balanced on top of the broom using Helmar Liquid Scrap Dots. This is a favorite use of this specialty glue, fixing odd pieces in hard to hold areas. I love, love, LOVE this stuff!

I used the neon green on the broom by brushing it lightly on top.

I think one of the favorite parts about the gelli print background was using my kitchen utensils ( better used here than in the kitchen! Can you tell I don't cook much any more?) It's small plastic thingy ( technical term ) with sharp edges that I raked through the paint in a wavy pattern. It gave me a defined writing line to follow which I appreciated since I always have a problem keeping my lines straight!

Products used and enjoyed:

Helmar 450 Quick Dry Adhesive, Liquid Scrap Dots, Craft & Hobby PVA Glue
Prima - Anna Marie Wood Embellishment
Gelli Plate 12x 14
May Arts - black twine, ribbon
Jillibean - green twine
Cricut - Happy Haunting, p. 54

entering my 6X12" wall hanging in:
 ( a place to link up those gelli prints!! )
Die Cuttin Diva's - #134 Fall Colors
Craftin Desert Divas - Anything with a Sentiment #16 Linky Party
Craftin Boutique - Anything Halloween Challenge #9 
2 Creative Chicks - Spooktacular Linky Party