Sunday, August 28, 2016

Artful Paper book by Rogene Manas

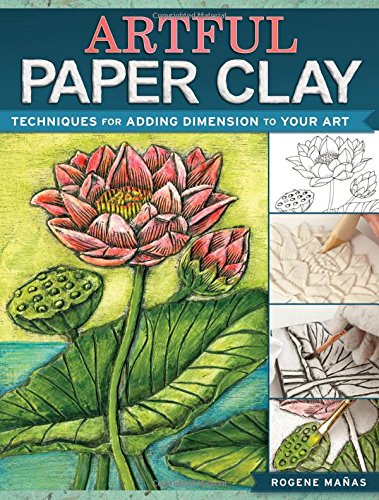
I was invited to review the new Artful Paper Clay book by Rogene Manas


which you can find on Amazon.com HERE!

1. Was the book divided in easy to follow sections?
YES! It actually has 4 parts and each one leads you into the next one for more in-depth study.
2. Were the instructions easy to follow?
YES! Great explanations and wonderful step by step guides.
3. Were the pictures helpful?
YES! They were great step out photos guaranteed to make sure you understood everything perfectly!
4. Would I recommend this book to my friends?
YES! I loved the book so much that I created Clay Work Project 1 - "Leafing Out". And here it is.

Now I have worked with Creative Paperclay before and you can find most of my projects HERE so I felt comfortable expanding on the original idea and making a textured base for my leaves, but the book does explain how to imprint onto the clay using stamps. ( I haven't tried the imprinting with stencils however and am looking forward to playing with that technique! ) The book will show you step by step how to do this and even offers you a site to go to download free printable patterns HERE!

I even picked up a few tips and tricks for both cutting the shapes out of the clay and for removing paint from it. I just love learning something new!

I also LOVE this quote from the book concerning color play
"I often compare looking at color to eating chocolate."
Yep, I was hooked at anyone who compares paint with chocolate, can we say soul artists? lol

I did experiment a little with my ColourArte's Primary Elements - Arte Pigments which are powders that you can mix with any medium. Rogene Manas discusses transparent and opaque paints and I wanted to see if I could get similar results using the Arte Pigments.

First set of leaves


The upper left and lower right leaves were to be painted with a transparent paint so I mixed the powders with my Gel medium.


And I was able to achieve a shiny yet translucent paint.


The second set of leaves


Next, the upper right leaf and the lower left leaf were to be more opaque so I mixed the paint with my white gesso and I got a soft matte look.


When you buy the book go HERE to receive a free handmade gift plus patterns and instructions for a fun and free paper clay project that is not in the book plus access to a private how to video demonstrating techniques used in the project!

You can find the blog HERE
Facebook HERE

Friday, August 26, 2016

ART 101...Back to basics of Gel Press blog hop

With all the kiddos heading back to school, Gel Press® thought we 

should take you back to the basics! Please visit each blog for an 

idea or technique that you may or may not have seen before!

 Happy Hopping!

Here are the blog links in case you get lost along the way! 
Keri 
Lea 
                            Sandee  <----You are here

Basic Technique I am using --->  Distress Stains on the Gel Press® plate

supplies:
5x7" Gel Press® plate
5½x8" Stratmore journal
Ranger Distress Ink pads and Distress Stain dabbers

Dry stamping
This is a basic
 stamp your ink pad directly onto your Gel Press® plate 
and then use your gel plate as a stamp! 
(by turning it over and using it directly on paper or like I love to do, directly into my art journal)
 I love that when you use your Gel Press® plate upside down like this it allows you to see exactly what your print is going to look like.
And add layers of colors since the colors are water based dyes they are translucent and they layer beautifully over one another mixing and blending into beautiful shades.

I have several other ways to do this simple technique and I made a slideshow depicting them but fair warning, this is ADDICTIVE! Turning your plate over and using it as a stamp and moving inks around is the next best thing next to chocolate.
Watch the slideshow at your own risk, I do not accept responsibility for any compulsive behavior of fun this might elicit.
***You have been warned.***

You might also want to pause at each segment if it's too confusing, let me know and I'll make a video instead :)

Here are the journal pages I made from my backgrounds :)


Tuesday, August 23, 2016

Has your art taught you anything new recently?

I'm more than willing to experiment, although sometimes I have huge regrets but hey, if I learned something then I figure it was a worthwhile investment of my time....and supplies...

And sometimes, my experimenting just causes a whole new set of problems...

If you belong to Gel Press Junkies over on Facebook then you know that I was having some issues with pens not showing up on top of Distress ink backgrounds that I created with my Gel Press® plate. When I set out to sketch my angel I used a ball point pen because I didn't want to ruin any of my other good pens. 
( This was my experimenting with different pens and it was also the start of a brand new problem
So the ball point pens really had the same impact as the Distress inks had...problems covering them up! ( BUT, they did write over the Distress ink, so score!...kinda, lol )You can see the pen marks, and even the paint didn't cover them up, and honestly it was like replacing one problem with another. At least the design of the Distress inks are prettier seeping through the paint than the ball point pen was.

So then I thought I would see if the gelatos would cover the pen marks, which they didn't, but I really do like how well gelatos work over paint...so I thought I would see how well paint goes over gelatos. ( At this point I wasn't even worried about the pen marks, lol Playing had taken over ) So I am liking switching between gelatos and paint so much that I now like the darn piece, pen marks and all...but...

I finally resorted to spraying the piece with a varnish ( which just takes time to let it dry, and I admit I am such an impatient artist ) which then let me come back with another round of gelatos and paint to finish her off, and I really like the results. 

So my lesson I learned? 
Keep going. 
Keep adding.
 Have fun!
And varnish!

What lessons have you learned lately?

Saturday, August 20, 2016

To finish or not to finish? That seems to be a very good question!

What to do when you love a page, or at the very least love what you've got so far but then get stuck? It's my mantra journal so I want something up-lifting but all I can think of are silly things like BOO or GUESS WHO? lol So with my mind in that train of thought I just need to leave it alone until the right thing to say comes along.

And yes, I am a tad bit weird cause I also find pleasure and humor in that it's opposite the UNFINISHED page...lol Maybe this is what it's suppose to be...Maybe it has finished itself for me?

Are you able to leave something unfinished or do you stick it out until it is complete?

Friday, August 19, 2016

Do you find yourself as an artist going through different phases?

This is my art journal page that I made after watching Faber Castell's live streaming show featuring Tiare Smith Woods. I might have added a few things of my own ( like I have to add details for a face, lol ) I enjoy creating in someone else's style occasionally. It's fun to do things that you might not ordinarily do, keeps you fresh that way. You can find the recording of Tiare's show HERE. (Margarita Mix and an Angel)


I added my whimsical angel on this background that I already had created which is a combination of left over acrylic paint brayered onto the paper and then an alcohol ghost print on top of that.

Phases

Do you find yourself as an artist going through different phases? Sometimes it's techniques like typography, gel printing, or maybe alcohol ghost printing? I know personally I have been rolling through several of these techniques lately. Or sometimes it's playing with all those techniques but doing it in an art journal.
I must be going through an art journaling phase right now, I can't seem to get enough of it. You can find the techniques to the bee page on the left HERE.

What phase are you going through?

Thursday, August 18, 2016

Achohol ghost printing...what do you think?


I posted the background pages that I was creating by spraying my stencils with rubbing alcohol after dripping alcohol inks through them the other day, and now I am making some art journaling pages from them. I am not one to just collect backgrounds although I must say I find this technique so fascinating that they are hard to cover up, but you can see that I used the one on the left side for my page today. It was a little bare towards the bottom and the "un" from unfinished wasn't showing so I just went with "finished". I kept asking myself (as sometimes we do when we are creating something)..."am I finished"? Since the answer seems to be no I just went with that and wrote never in all the little openings.

Giving it a name

And speaking of unfinished....the right side (above) is looking much better with a few more layers of alcohol ghost prints, for lack of a better term that is what I am calling it.

Yeah, "alcohol ghost prints"...I like it, what do you think?
or drunk ghosts....lol
Check out the alcohol ghost prints I made here.

Wednesday, August 17, 2016

NO!

Last weekend my friend Tommy Jo and I were out walking around some art galleries, looking and discussing art. When I saw this one I had 2 feelings immediately...
1. It's such angry art, why would someone want to hang this in their home?
 and 
2. I could reproduce that in my art journal using my Gel Press®!

So I guess you can say it both repulsed bothered me and intrigued me all at the same time, isn't it wonderful when art does that?

So last night I was looking through all the beautiful backgrounds that I made recently (I made a video but can't share it yet)
and I chose this one to use from my journal.
 I'm not sure why this resonates with me except that "focusing and saying no" seems to be a hot topic right now among many of my friends.

Do you have a hard time saying NO? 


Tuesday, August 16, 2016

Cast aside, neglected and forgotten no more!

Ya know, usually I can steer clear of these people enablers, but Mary Beth Shaw from Stencil Girl sucked me in big time. For one, the technique she showed used 2 products that have been sitting on my shelves for a couple of years....YUPO paper and Alcohol Inks. So what did I have to lose? Well, it's now going to cost me more money cause I want to do this..like....every day! lol

I gave the technique a half hearted try yesterday just to see if she was leading me down the rabbit hole, and surprise to me, with my minimal effort it worked! OK, let's now try and really follow her directions, so I got out some YUPO and all 3 alcohol inks I owned plus a new stencil from Artistcellar and gave it my all.

So this is the YUPO paper under the stencil and covered with the alcohol inks. I set it aside to dry under a fan.

After it was dry to the touch I removed the stencil.

WOW! Look what it left behind! Beautiful bright colors and everything looks like it was outlined but I promise you this is untouched. I LOVE it!

Alcohol Ghost printing

Now for me, this part is also exciting. Because I don't want to waste anything I went about to see if I could salvage any of the inks left behind on the stencil. I sprayed the pages in my journal with regular rubbing alcohol. These pages were covered with acrylic paint and I pressed the stencil in between the sheets, and look at all the color that transferred! Totally digging that one on the left!

Excited, that it had worked so well I repeated the process but this time I tried it on untreated paper in my journal...again, WOW! Love BOTH of these!

I'm enjoying this so much, that this time I thought I would take a picture of my process in case someone didn't understand what I was doing because I just knew I had to share! So I snapped a picture of my stencil sandwiched between the next section of papers. I used my brayer to make sure I was getting an even contact between the stencil and the papers.

 Removed the stencil and was only a little bit disappointed. By this time I have used up most of the alcohol inks from one side of the stencil but still got a great print from the other side.

 I set my book upright to let it dry out since I had wet all the pages with alcohol, but I have to admit, it's hard to stop playing with this technique!

In all seriousness, thanks Mary Beth for steering me to this technique and helping me to spend September's art budget
( I've already spent Augusts') lol
Link to Mary Beth's video

Monday, August 15, 2016

I hope they bury me with a paintbrush in my hand

Sooooo...you might have seen a few posts recently where I have been playing with some Distress Inks on top of my Gel Press® plate and well, just LOVING it! I use me 5x7"plate or sometimes the smaller Petite plates just like stamps in my 5½x8" Strathmore journal. And that was the first layer on my page.

Then I painted the stencil ( yes, you read that correctly, "painted the stencil" ) and pressed it down onto the journal page. I went over the image with some paint where it didn't come through as defined like I wanted it to be, and then outlined it to make it stand out.

Next, I dropped some alcohol inks through a flower stencil, let it sit for an hour and then removed it. I need to work on that technique, but I think it has great possibilities.

And lastly is my attempt at typography, I think I will forever be working on that skill but when I think of what my writing looked liked 6 years ago ...well..I can say I have improved, and I can also say I still have room for improvement...lol


I just love this stencil set, Danse Macabre series Artistcellar.  

And yes, I really would be happy buried with a paintbrush in my hand!

Sunday, August 14, 2016

Fly

 entering my journal page in
ColourArte's Monthy challenge - Vivid Ultra Metallic Paints


I used my Gel Press® plate along with some acrylic paints, Vivid Metallics and some stencils to create my art journal page. 

But today I thought I would show you how I use my embossing tool, which I haven't used to emboss anything in over 10 years at least ( it always hurt my hand ) BUT I have used this tool soooo much in painting! You can see here I removed the cap from the Vivid bottle ( I was cleaning it ) and when I tested to see if the passage was open, well, some paint came out so I grabbed my tool and scooped it up.


 It was very easy to do some fine outlining this way. Now I could use a paintbrush but I'm weird like that, lol And I should note that I applied the Blue Sky Metallic paint through the stencil with a palette brush because I wanted to play up it's dimensionality.

 I also like to squirt out a portion of paint when I have big areas to cover.

 And then spread it out using the tool. You can tell from the tool that I really do use it a lot in this capacity...no lie, it's one of my most reached for tools.

A little close up picture of the Metallics but the picture doesn't do them justice.

Saturday, August 13, 2016

Scrapbooking revival, had you heard?


I use to scrapbook a LOT, and then stopped after my divorce, but now I have reasons to start it up again!! I have this over-the-moon cute grand nephew and I'll now have ( hopefully soon in my hot little hands ) a 12 x 12" Gel Press® plate. Now if you are wondering why I am so excited it's because the 12x12" plate allows me to create double page layouts with matching paper. I use to have to hunt for scrapbook papers that did a flip image but no more!

 I can make my own!

I also love that I can make my papers to coordinate with the photographs, I mean really, how many times have you tried to match the photos and paper when you create a LO? It's hard! I know I had made extra trips to the store trying to find the right paper! 
Now, problem solved!

And you don't have to be an artist to create fun LO's with the gel plate. On this LO I simply used my brayer for the lines and the 6" circle plate to create the balls, and I have a color coordinated paper to match the photos! This is a lot more fun than just going out and buying preprinted paper!

And of course, you can always make single pages like I did here, and you can check out this blog post for the tutorial :) On this one I turned my gel prints into digital photos and then used photoshop to arrange the pictures. I really don't do many single page LO's but this one goes on the front page of his book so it's special!

I love the idea that when this book is finished I will not only have my pictures to reminisce about but will also have my art work to look back on too! 
Now, how cool is that?


Friday, August 12, 2016

Does your Social Media etiquette need tweaking?

I'm still experimenting with using Distress Inks on my Gel Press® plates. Yesterday I used them on untreated Strathmore paper and today I used them over an acrylic brayered background ( thanks to Ineke from the Gel Press Junkies for that idea ) I love this little hexegon plate and of course hexagons just represent honeycombs, right? Well, it does for me! Although I would love to hear your ideas for hexagons so please leave me a comment if you have an idea!

my thought wish for the day
 This quote is appropriate for the social community world which Carnegie often refers to as a “Beehive”. The number one rule in social communities – offline or online – is to behave while in the beehive and don’t aggravate, criticize, judge, or be grumpy. 
I wish more people ( especially during the election ) would do this.
...sighs...

Thursday, August 11, 2016

Are you a Gel Press® Junkie?

YES! I admit it I am a Gel Press Junkie!
I cannot get enough of it and love making print after print!
Housework doesn't get done, gardening chores are ignored all to satisfy my need...no my addiction to making gorgeous mono-prints....one after the other....again and again....

I love our Gel Press Junkies page over on Face Book because I get so much inspiration from everyone there! One of our members ( Linda Sims ) asked if anyone had used Ranger's Distress Inks directly on their plates and I thought that it was a great idea! Thanks Linda!

I have been playing with my Petite plates in set A so I grabbed the small square and proceeded to experiment. I'll need to make a video to show you some tips and tricks but here is what I created in my small 5½x7" Strathmore journal.

LOVE!
How about you? Does this fulfill the addict in you?
Aren't your hands just itching to go play now?

Wednesday, August 10, 2016

Did you know that Gel Press® can do this?

It all began with a pair of blue jeans so old and worn out ( yes, they actually had holes in them...in all the wrong places if you know what I mean ) that I couldn't do anything but throw them away. Well, that is until it dawned on me to try printing them using my Gel Press® 8x10" plate.

This is a little paper canvas I made with the results, and you can go watch the video here to see how easy it is to do!

And remember we YouTubers sure do love a "thumbs up" if you like our video!
Thanks!!

I also have this project up on the Gel Press® blog today, can you figure out what I used differently? It might be part of the plate you never considered using! Go check it out and I would love for you to leave me a comment over there so I know you stopped by!

I have a new idea for you!

BUT you need to go over to the Gel Press blog so I can show you a creative way to use allllll of your gel plate that you might not have considered before! Hop on over to the blog so you can see what I'm talking about and to see the outcome of this journal page :)

Saturday, August 6, 2016

Bring Us Your Best

I must say it has been an exhausting 2 weeks for me, with trying to get everything ready for the Bring Us Your Best art show but now it is over and I made a little video to bring the show to you!


Now I would love it if you would click on that little youtube button in the bottom right corner...see it?...yep, over there. If you do that it will take you to the video where you can do all sorts of lovely things. You can give the video a "thumbs up", and hey who doesn't like getting a gesture of approval? You can also leave all the artists a wonderful comment, which I am sure will make their day and well, it also helps with my youtube ratings! And lastly, but definitely not least, you can subscribe to my channel, and you never know what I might be airing...just saying, keep in touch!

Wednesday, August 3, 2016

Life Lessons

I figured this would make a great little gift for the tween in your life. Swing by the Arnold Grummer blog to check out the inside to the booklet.

****UPDATE****
BOTH pieces, "in the hills of North Carolina" and "Metallic Swamp" made it pass the jury and will be in the show! Entering 2 pieces was a first for me, usually I am too chicken and only enter one. 

And...
I'll be out at Jongo Java today hoping for some people to sit down and join me in making some mail art today...if anyone shows up I'll share some pictures of it tomorrow.

I'll have this up on the table as a display.

Also made this flyer that they can take home with them.

And of course this one explaining the show itself.

Now let's see if anyone dares approach the table, lol