Showing posts with label wall hangings. Show all posts

Sunday, April 27, 2014

Sundays with Sandee

Do you love your lettering?
I admit that a year ago, I did not. I began seeking out others who could help me, like Joanne Sharpe, and if you need some inspiration, then she has a fabulous book to get you inspired.
The Art of Whimsical Lettering

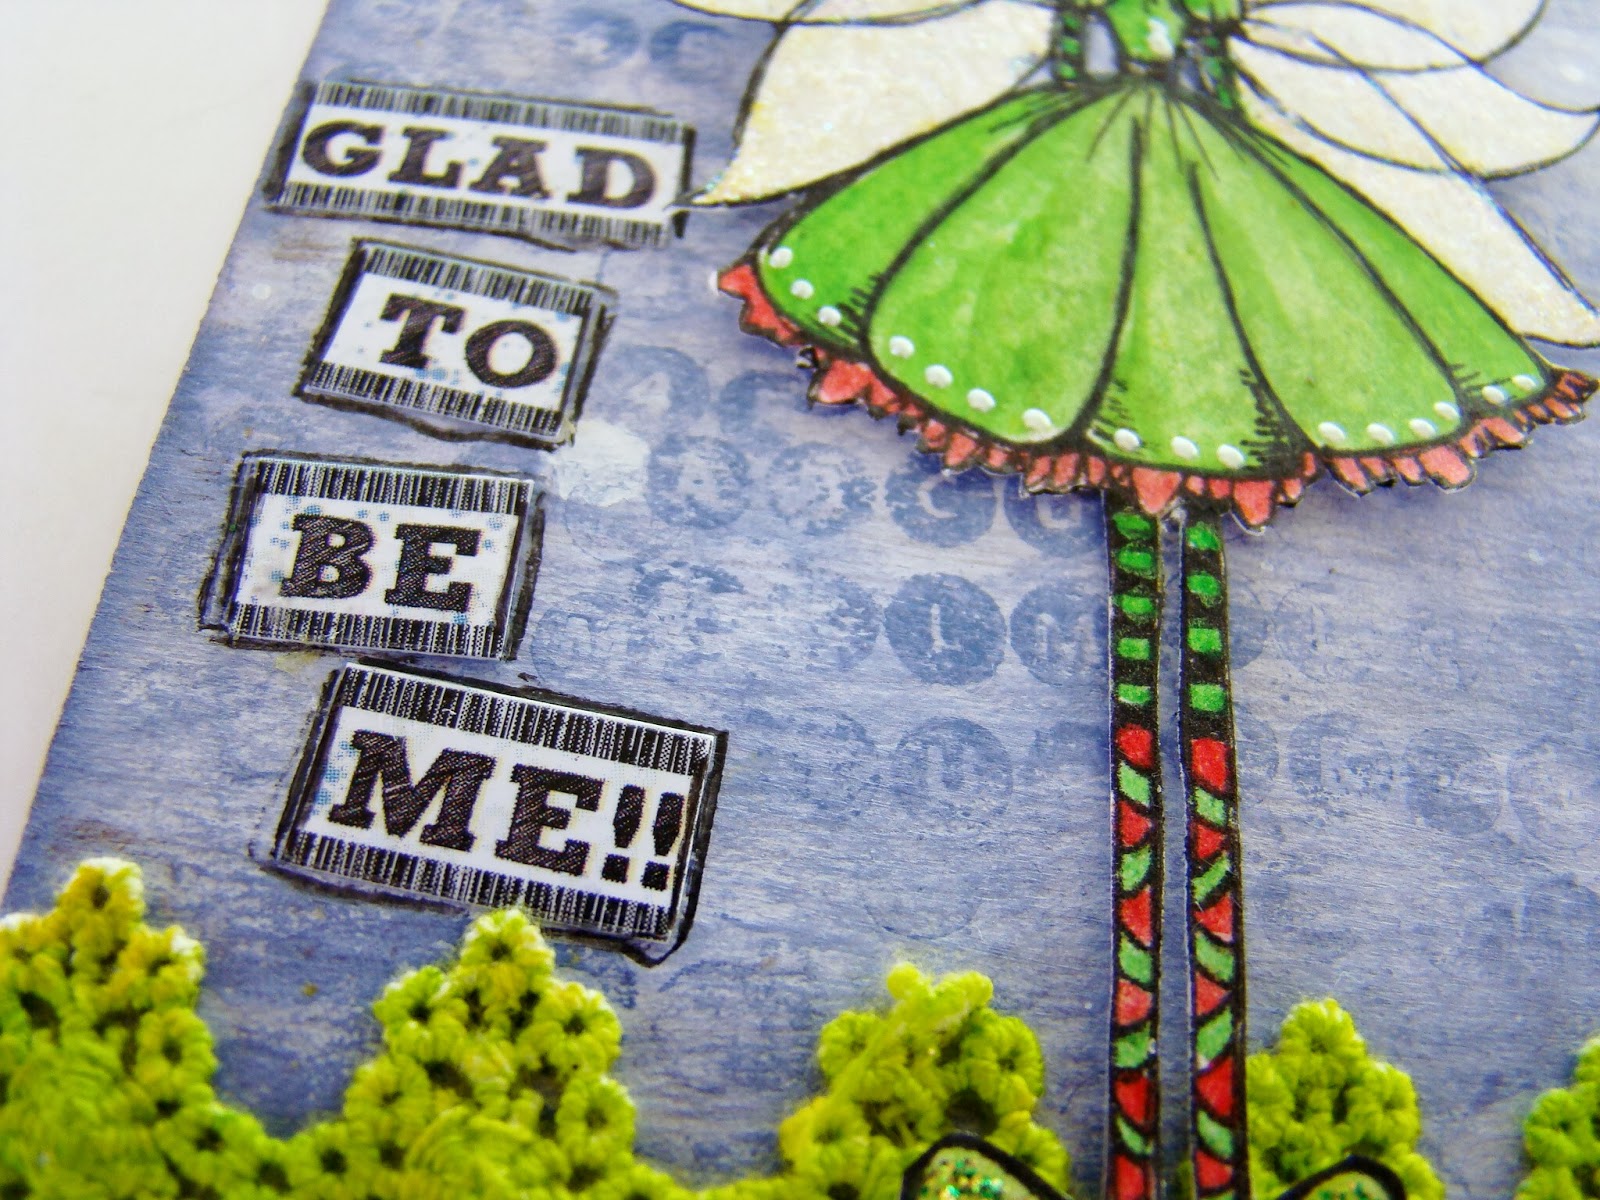
Everyone knows that I sell my signs and I have been lucky to have some success with it, but lately I have started selling signs that use my own handwriting, and that really puts a smile on my face. Here are a couple of my wall hangings that recently sold where I used my own whimsical lettering style:


SOLD~ in the hills of North Carolina: Helmar - Summer

So, if you don't like your lettering then please join me every Sunday for some lettering practice, 
writing is an art style, 
the only thing you have to do, 
to get better at it...
is to practice!

Here is my latest wall hanging, I am sure you know the drill by now. If you want to see the video for creating this, then please hop over to the Frosted Design's blog and while you are there, you can leave me a comment...hint, hint...lol

I'd love to enter all my hand written signs into the Moxie Fab World's
but this is my newest one so I will enter "Advice from a mountain."

Thursday, April 3, 2014

Autism awareness


The Autism Awareness Ribbon — The puzzle pattern reflects the mystery and complexity of the autism spectrum. The different colors and shapes represent the diversity of the people and families living with the condition. The brightness of the ribbon signals hope — hope that through increased awareness of autism, and through early intervention and appropriate treatments, people with autism will lead fuller, more complete lives.


Both of my background papers came from gelli prints using the new line of Deco Arts Media Fluid acrylics
DecoArtĀ® Mixed Media Program
They are a lot of fun to use in your gelli printing and this sign shows why. After putting my colors down on my plate, I lightly brayered them in one direction only. 

The first several pulls will give you a very bright and vivid background, After it dried I used a white pen to trace around some puzzle pieces to create the background.
 ( On a nationwide level, the Puzzle Piece symbol reflects the mystery and complexity of Autism Spectrum Disorder (ASD). Also, since every puzzle piece is different in some way, a puzzle piece accurately represents the diversity of the individuals affected. )

But it's the last pull that gets me, you know when you have dried bits of paint left over? Just squirt a healthy layer of water onto your gelli plate and press your paper down to get a dreamy soft swirl of color. Your paper will most likely curl after soaking in all that water, but just let it dry and then press it under some heavy books and it will flatten back out again.

Lettering completed with a Sakura Gelly Roll pen, wood butterfly from the Frosted Designs Moments in Time Kit.
A Moment in Time

Wednesday, March 12, 2014

Frosted Designs Kit Challenge

Sooooooooo....if you happen to visit my blog then you might know that our March kit is out, called A Moment in Time, which is gorgeous!! And to think kits like this can be delivered right to your front door! Does life get any better?
A Moment in Time

Which brings us to the Kit Challenge !!

We are going to stick with a recipe as it gives you, the subscriber, more control over which items you would like to use.  Remember: ANY TYPE OF PROJECT is acceptable so long as you use at least three of the following items from the kit:

~ Black Background (Can be solid cardstock!)
~ One Word Title 
~ Chipboard or Wooden Die-Cuts (At least ONE piece!)
~ Flowers (At least ONE!)
~ Ribbon

Fell free to use other items as you normally would...  Just be sure to include three of the above on your project to be entered in to win a fabulous prize! Check out the Frosted Designs Blog for details!

And here is what I created using: 
1. black background
2. wooden die-cut
3. flower


other products used:
Ranger Distress marker, Crackle Paint

Thursday, February 13, 2014

Birds-eye view

Seeing from a point of view from an altitude or from a distance; a comprehensive view in a downward direction; also called an “aerial view”.
------------------------------------------------------------------------------------------------------
Limor Weber's February challenge ( color challenge plus journaling prompt )

Simon Says Monday Challenge - We love Stamps


♥ A shimmer shot

More wonderful shine ♥ and hand lettering. Everything was drawn using a pipette and ink and once dry I go back and sketch around the designs with a waterproof pen. This puppy has been sealed with Helmar Crystal KOTE Varnish to protect the inks and colors.
 Love the ghost writing I did using my water brush with the inks
 Purposely blurred out the journaling, but it's all about what I wish I had done, what I wish I had been told, etc. to have become an artist who is confident. I wrote it out on the backside of my art work and then glued the piece to my board so it cannot be seen. :)

Close to my Heart - stamp
various inks - Dylusions ( Bubble Gum Pink,  Lemon Zest )
 Lindy's ( Starburst Tiffiany Lou Blue, Sea Mint Green and Moon Shadow Mist Gossamer Gold )
Sakura Pigma Sensei - waterproof pen
Signo - white pen

Sunday, January 19, 2014

Sundays with Sandee - Twist and turn it baby!


This is a mixed media wall hanging using the Flossie Stencil "as is" and painting a layer of Ranger Distress Crackle Paint over it.


Found art:
metal flower from parking lot
Ranger - tissue tape


Altering the stencil a little bit, now giving her some fluidity by painting her in with a pipette and Dylusion Inks.


other products:
 Pigma Sensei pens
Deep Red face stamp


Again altering the Flossie stencil and coloring her in with Lindy's Starburst Ink Sprays and some magicals plus some masking.

other products:
Pigma Sensie pens
Fluid Masking
Letter Jumble stencil


And finally, an altered Flossie with her arms down in front holding a heart, all colored in with the Lindy Magicals.

other products:
Pigma Sensei pens
Deep Red heart stamp

Tuesday, January 7, 2014

Abstract Expressionism

Art that rejects true visual representation. It has few recognizable images with great emphasis on line, color, shape, texture, value; putting the expression of the feelings or emotions of the artist above all else.
---------------------------------------------------------------------
entering my 6 x 12" Blue wall hanging in:
Simon Says Stamp Monday Challenge - Blues

 I love my little lady balancing on the telephone wire with her crow friends, sometimes it's fun to
 think abstract.

Of course, getting a few zen dangles in also makes me smile! 

I enjoyed all the different layers, the molding paste rain drops, the painted and inked girl with her puffy paint hair, the layers of lace, twine and buttons and the doodling: are all my favorite elements in one piece.

Sakura pens
November Frosted Designs kit - buttons, lace, flower
Golden Molding Paste
Crafters Workshop - raindrop stencil
Deco Arts acrylic paints
Faber Castell PITT pens
crow stamps - misc. ( old )


Tuesday, November 19, 2013

Frosted Designs tutorial using inks


I love, love LOVE the 2013 November Mixed Media Kit from Frosted Designs! I made this 6 x 12" wall hanging using most of everything from the kit!

and a short video explaining the different ways I used the inks:
( OK, so I am still learning how to edit my videos, the caption that comes up saying "opps I meant to say Lemon Zest"..is suppose to be when I am showing the Lemon Zest spray but calling it Fresh Lime!!.. All I can say is, it was in the right spot when I saved the changes!!...ugh!! )

I love the Faber Castel watercolor crayons, they sure made coloring in my digital image easy! I love how you can mix the crayon colors together to get a custom look like I did with her hair.

And the Faber Castell PITT pens made coloring in those tight small spaces a snap!

None of my projects are complete without the use of my Helmar products and popping up her head is one of my most favorites...Liquid Scrap Dots!

Faber Castell - Watercolor crayons, Gesso and Pitt Pens
Dilly Beans - #381 Isabella Fairy digital image
Ranger - Dylusion Spray inks, stickles, liquid pearls
Chipboard clouds

Don't forget that you can sign up for the
Mixed Media Paper Kit subscription
and then we play together each month!!
*FREE Dylusions Creative Journal ($24.99 value) with any first time 
mixed media paper kit subscription! 
Offer expires November 30th.

entering this wall hanging in:
Creative Inspirations - Anything Goes

--------------------------------------------------------------------------

Whether you are a journaler, mixed media artist, scrapbooker, or other type of crafter, hand lettering is a visually dynamic way to add textural elements to your work. I have a book review of
Creative Lettering that I'd love for you to check out.
Let's learn to love our handwriting!

Friday, October 25, 2013

Helmar makes Halloween a "snap"

It doesn't have to say Halloween in order to be considered spooky, take this fabulous quote by Morticia Addams, the fictional matriarch of "The Addams Family" created by cartoonist Charles Addams
( This was one of my favorite shows as a kid!! Did you watch it? )
To get you in the mood, feel free to trip down memory lane with by watching this:

Are you snapping your fingers and singing along with me? 

Helmar Craft Glue worked beautifully adhering the pearls and rhinestones to the plastic spider.

I added glitter over the glue to add more sparkle.

Helmar Liquid Scrap Dots was perfect for adhering the spider's body to the board. Since he was hollow, I filled up the space with the Liquid Scrap Dots and then smooshed him down to the board and released. When it was released the Liquid Scrap Dots filled in the gap between the board and the spider's body.
I used the Helmar Crystal KOTE Gloss Varnish
to seal in all the inks and sprays that I used creating the background.


other well enjoyed products:
Really Reasonable Ribbon
Want to Scrap - pearls
Martha Stewart - glitter

I love it when I make something and it sells within 24 hours, 
it was barely hung in the shop before it went home with someone!

entering this snappy sign in:

Simon Says Monday Challenge - spooky
Rhedd and Rosie's challenge blog - #18 Anything Goes 

Tuesday, October 15, 2013

Deco Arts ~ Gelli plate with stencils

For my Deco Arts post today, I wanted to play around with some different kinds of paints on my Gelli Plate, and I now have a new love, its the Satin Enamel paint and it is a hard, durable paint that flows and levels out to a smooth finish. It is awesome and I LOVE it, you don't have to use much at all, a little bit goes a long way on the gelli. 

I also played around with the Black Frost paint which is a glass paint. Keeping in mind that it is not intended to be used on a Gelli Plate, it did pretty well, and it cleaned off the gelli plate with a little elbow grease, I probably won't use it on the gelli again, but in a pinch it worked out fine. I used it on the chipboard raven too, so you can see the intensity color difference when it is used alone or layered on the gelli. 

You can see where I added the 3D Gloss enamel circles by adding the paint to the dot stencil, giving a nice layered and completely translucent effect.

There you have it, different types of paints from the norm being used.
A glass paint and a wood paint, both worked with different degrees of success.
So, overall, a mix of different paints were used other than the standard acrylic paints, with one paint standing out in a big way, which was the Satin Enamel.
 I loved it so much I have used it on several other projects:
The mixed media wall plate covers and the frame around my bathroom mirror
( Will be giving my lower cabinet the same treatment as the mirror frame. )

Deco Arts products used:
*Satin Enamel - sage green* dark walnut*

other well loved products:
Reminisce sticker letters, white pen

Helmar Krystal KOTE Gloss Varnish
Helmar 450 Quick Dry Adhesive

entering my 6 x 12" wall hanging in:
Craft Room Challenges - Our Feathered Friends
Challenges4Everybody - #31 Anything Goes
Carolyn Dube - October's Colorful Gelli Print Party

Saturday, October 12, 2013

Eremophobia: noun

The morbid dread of being alone
pronunciation
---------------------------------------------------------------------------------------------------
Jo's Scrap Shack - FFC #21 "Favorite Technique" ( dripping inks and spatters )
Carolyn Dube October's Colorful Gelli Print Party
 {my Sweet earth} - October Inspiration
Create to Live Challenge

I loved the color palette for October but my mind wanted to use them in a non Halloween projects and I wanted to use my new stencil I made ( inspired by Carolyn Dube ) by drawing an image on cardboard, and then outlining it with puffy paint and heat setting it to rise up. I planned on using it for my gelli plate but it got it's first run as a stamp on paper, and I LOVE how it turned out. This is the stamp I made, it's about 5 x 10".

I rolled on orange paint with a brayer and then stamped the paper with it.
Whatever didn't print I filled in with a paint pen.

I dripped ink sparay inks and made delightful splatters following the October color palette.

Susiebee Studios - Bouquet paper
Viva Decor - brown Paint Pen
Ranger - Dylusion Ink sprays, bubblegum pink, lemon zest
Distress Stain, vintage photo
Tattered Angels - popsicle, midnight blue
Golden gesso
Helmar - Liquid Scrap Dots
Faber Castell - PITT Pens, walnut brown,black
Reminisce white pen

Tuesday, October 1, 2013

Deco Art Blogger - Halloween wall hanging

My first Deco Arts Blogger post!!

I wanted to create a Halloween wall hanging using a Gelli print background and I wanted to experiment with some different paints to see how they worked together.

Deco Art Paints:
Americana Neons - Thermal Green
Dazzling Metallics - Royal Ruby
Americana Frost Gloss Enamels - Black
Paper Effects -Black Pearl
Bright Accents - Gloss Acrylic, black


The metallic and neon paint did exceptionally well together. The metallic subdued the neon a little bit but still leaving enough of it to pop out without being obtrusive to the overall design. The frost glass paint applied well but was a little harder to clean off the gelli plate, but still highly doable.

I fell in love with the Paper Effects Writer with it's dual tip. The fine tip was excellent for writing words and for fine detailing. I did make sure to clean the tip well before storing it.

I used the Paper Effects 2 ways along the border. I doodled a fine line and squiggly marks using the tip, and went back and added larger drops using just the bottle's tip. I also love my little spider, I set him up on the Helmar's Liquid Scrap Dot Adhesive for some dimension and used glossy accents over his body. The stem of the broom was painted with the Neon Green and Deco Arts Bright Accents in black.


This great little wood accent from Prima was balanced on top of the broom using Helmar Liquid Scrap Dots. This is a favorite use of this specialty glue, fixing odd pieces in hard to hold areas. I love, love, LOVE this stuff!

I used the neon green on the broom by brushing it lightly on top.

I think one of the favorite parts about the gelli print background was using my kitchen utensils ( better used here than in the kitchen! Can you tell I don't cook much any more?) It's small plastic thingy ( technical term ) with sharp edges that I raked through the paint in a wavy pattern. It gave me a defined writing line to follow which I appreciated since I always have a problem keeping my lines straight!

Products used and enjoyed:

Helmar 450 Quick Dry Adhesive, Liquid Scrap Dots, Craft & Hobby PVA Glue
Prima - Anna Marie Wood Embellishment
Gelli Plate 12x 14
May Arts - black twine, ribbon
Jillibean - green twine
Cricut - Happy Haunting, p. 54

entering my 6X12" wall hanging in:
 ( a place to link up those gelli prints!! )
Die Cuttin Diva's - #134 Fall Colors
Craftin Desert Divas - Anything with a Sentiment #16 Linky Party
Craftin Boutique - Anything Halloween Challenge #9 
2 Creative Chicks - Spooktacular Linky Party


Wednesday, August 28, 2013

jape: verb

to say or do something jokingly or mockingly

to make mocking fun of

-----------------------------------------------------------------------------------------------------------------------
Simon Says Wednesday- Anything Goes
 Creative Inspiration - Inspired by: Anything goes


I free hand painted the tree trunk but used all sorts of odds and ends for the dots ( erasers, wine corks, the end of paintbrushes, etc. )

Recollections - glitter sticker letters
Viva Decor - pearl paint
Apple Barrel - acrylic paint

-----------------------------------------------------------------------------------------------------------------------

Having a great time on vacation, Jamie and I are plowing our way through some Pinterest recipes, last night we ate bite size apple pies and at the beach I got to see my first Royal Tern.