Showing posts with label 12 Tags of 2012. Show all posts

Wednesday, February 5, 2014

Shades of Spring Frosted Designs kit

We have our first kit challenge over on the Frosted Designs blog. With everyone buying our gorgeous kits we have decided it's time to reward the kit buyers with a special challenge all for them!

It's a recipe challenge:
(Remember, you only have to use THREE or more... not all of them!!!!)
White Gel Pen (GREAT for faux stitching!)
At least ONE of the Distress Inks (Lemon and Raspberry included!)
At least ONE of the wood veneer pieces
The color PINK
At least ONE sticker (Full sheet included!)

I started out with an old scented tag.

Which I covered with the pattern paper on one side and added all my wonderful embellishments that came with the Shades of Spring kit. ( The heart bead and paper streamers did not come in the kit, but it's so cute and was just a perfect addition. )

I added some water to the KaiserCraft flower and then just touched the tips of the wet petals to the Distress ink and let it wick into the paper. After it was dry I added glue to the tips of the petals and dunked it into the jar of ( Distress glitter, from the Love is in the Air kit )

I covered the veneer bird with the Picked Rasberry Distress ink and a little bit of white paint. The parts of the Basic Grey Enjoy sticker that hangs over the edge have baby powder on it to keep it from being sticky. I also outlined the sticker with one of my Sakura Magna drawing pens.

I covered the back side with the Ranger Juniper Dauber and then a layer of Crackle paint. The To and From were stamped on using a Fiskars stamp set.

I really love Crackle Paint! The texture is amazing!

Simon Says Stamp Wednesday Challenge - Have a heart

Saturday, December 29, 2012

skin of my teeth: phrase

Narrowly; barely
  
The phrase first appears in English in the Geneva Bible, 1560, in Job 19:20, which provides a literal translation of the original Hebrew:
"I haue escaped with the skinne of my tethe."
Teeth don't have skin, of course, so the writer may have been alluding to the teeth's surface or simply to a notional minute measure - something that might now be referred to, with less poetic imagery than the biblical version, as 'as small as the hairs on a gnat's bollock' ( testicles )
  
--------------------------------------------------------------------------------------------------------------------------
 
Whew, just got the last tag in by the skin of my teeth. I wasn't even sure I would make it, but make it I did! I just couldn't make it the same way TH did though, but I like it none the less.
I didn't make the extra tag, I am all out of Christmas. lol
 

also entering this in:

Little Scrap Pieces - Fun Friday "Winter" Challenge ( I wish we would get some snow here! )
Divas by Design - Challenge 66 Anything Goes
Simon Says - Anything Goes
 
 
Ranger - Broken China, Symphony Tissue Tape
stickles - Orange Peel, Stardust
Cricut - Winter Wonderland cartridge, p. 69 ( Brrrr )
Stretch Your Imagination cartridge, p. 80 ( tag )
Stampabilities - silver ink
S.E.I - Holiday Cheer stickers ( snowman )
Martha Stewart - Winter Snows glitter
Reminisce - white pen
K and Co. - pearl
American Crafts - Holiday House plastic snowflakes
Faber Castell - PITT pen
Glisten Gloss - white tinsel
 

Friday, November 23, 2012

prudent: adjective

 
exercising good judgment or common sense
 
-------------------------------------------------------------------------------------------------------------------------
Die Cuttin Divas: Challenge #92 Thanksgiving
 
 
I first cut my tag from the Cricut Stretch Your Imagination cartridge, then lathered on Rangers Ditress Stains in Mustard Yellow, and Barn Door. Now here is where I learned a lesson using my new acquired Dylusion Spray, Melted Chocolate....it covers everything and it absorbs all colors. Oh well, I still love it, will just have to be more prudent when applying it! Since I didn't have a hatch background stamp I used my Faber Castell Pitt Pen to make lines across the background.
 
 I then cut a piece of burlap and glued it into the corner with Aleene's Tacky Glue, layering the fall leaves cut from the Simply Scarecrow cartridge and the branches cut from the French Manor cartridge. I had some wheat from an old floral arrangement so I glued them down and added a twine bow. I then added letters from Reminisce's Unwritten.
 
To finish it off I added the Inkssentials Glossy Accents and for the sheer fun of it...just to see how it would react, I added a dollop of Citrus Alcohol Ink while it was still wet. It spread out pretty well, but I like the mottled look on the right corner of the acorn.

--------------------------------------------------------------------------------------------------------------------


I am joing a group of ladies for a little Christmas incentive :
Chrissy from Muse of the Morning - http://www.museofthemorning.com
Heather from Feather's Flights - http://www.feathersflights.com
Melissa from Love Bug Living - http://www.lovebugliving.com/

Chrissy, our creative leader has a slew of Pinterest ideas for handmade ornaments that she posted all the links to, you really should go check it out if you are planning on making some ornaments this year for your tree, or maybe as a great gift idea!! Go check her out on Muse of the Morning and also check out her adorable stuffed star ornament....makes me wish I could sew!


Wednesday, October 31, 2012

improvise: verb

to make or fabricate out of what is conveniently on hand
-----------------------------------------------------------------------------------------------------------------
Wishing all my WOYWW ladies a happy day filled with lots of crafty goodness!
Here is my desk area...I have my "light area" set up to take a picture of some product. I wish I had a light box, well, sometimes I do anyway. I really don't have the space for it if I owned one. I have 2 pieces of white board taped together, which I prop up to use for photographing cards and small items. It works pretty well, considering what it is! lol
-------------------------------------------------------------------------------------------------------------------
Rodaina from Egypt sent me this adorable card:
-------------------------------------------------------------------------------------------------------------------------
Thank you to everyone who e-mailed me about concerns from Hurricane Sandy. We all did pretty well here in the mountains, strong winds did some damage and we lost power some, but all in all we are very lucky compared to the people who live up north of us on the coast. My thoughts and prayers go out to them.
-------------------------------------------------------------------------------------------------------------------
My tag for the Tim Holts 12 Tags of 2012. ( October )
I saved it for Halloween Day!
 
 
 I didn't have the tissue paper but I did have the Tim Holtz Tissue Tape - Symphony, so I used that, crumpled it up and spread some acrylic paint on it and did use a hand wipe to blend. Then sprayed it with my Tattered Angels glimmer mist. ( Now I did have the Ranger Perfect Pearls, but it hasn't been opened yet, I'm one to use up a product before opening a new one, and I still have some glimmer mist left...frugal...very frugal I am! )

I used the Cricut Craft Room to weld together the word BOO  ( from the CCR font ) and a spider web ( Happy Hauntings cartridge ) onto Tim Holtz's Grungepaper ( I really love this stuff!! ) I painted it black with Apple Barrel's acrylic, and then used my Ranger stickles , Black Diamond over it.
 I didn't like the spider that came with the web cut from Happy Hauntings ( it looked like a tick, not spider like at all, lol ) so I cut one from Cricut's Paper Trimmings, and repeated the same steps as the webbing. I also had to improvise for the ticket and used my Hero Arts - Calender stamp, to create the ticket and added a Reminisce word sticker. Last touch was the orange spider eyes...errrriiieeee...:)

Happy Halloween y'all!
---------------------------------------------------------------------------------------------------------
 

Saturday, September 8, 2012

flashing tape : noun

 
Roof flashing is placed around discontinuities or objects which protrude from the roof of a building (such as pipes and chimneys, or the edges of other roofs) to deflect water away from seams or joints
--------------------------------------------------------------------------------------------------------------------------
I found my old tool chest that I use to carry around all my art supplies in when I was a teenager. One, I am amazed that it held everything I needed back then, ( compared to the hoards of stash I have now ) and secondly, I found this tiny little watercolor tin inside. I use to love miniatures, so it was treasured for a long time.

Until making this discovery I had no idea what I was going to do do for the Tim Holtz September tag as I didn't have anything that he used, and I felt quite stumped for ideas, but as soon as I saw the watercolor tin, an idea leapt inside my tiny brain....scary, huh?

The splotches of paint in the tray are the alcohol inks I used to color her in with, I thought it would be cute if it looked as if she had just finished playing with her watercolors.

I took notice of Tim's "* the details" and drew a child's version of a kitty, messily colored in to tie in with the watercolors, and even the girl herself is a stick figure drawing much like I use to draw as a kid, then further enhanced the theme with the red heart with art...as in "art in my heart".
I used a quilters wheel for the outside edge of the tag, the pen technique for the eyes, the paper piercer for the the dots, and an embossing tool to draw the girl.
 
Tim Holtz -Alcohol Inks - Citrus, Sail Boat Blue, Watermelon
Tim Holtz - Tissue Tape - Symphony
Tim Holtz - Grungeboard - stripes elements
Scorpal Tape
Faber Castell Pitt Pens
Flashing Tape

Sunday, August 5, 2012

fickel: noun

 describes persons or things that are not firm or steady in affection, behavior, opinion, or loyalty
------------------------------------------------------------------------------------------------------------------------

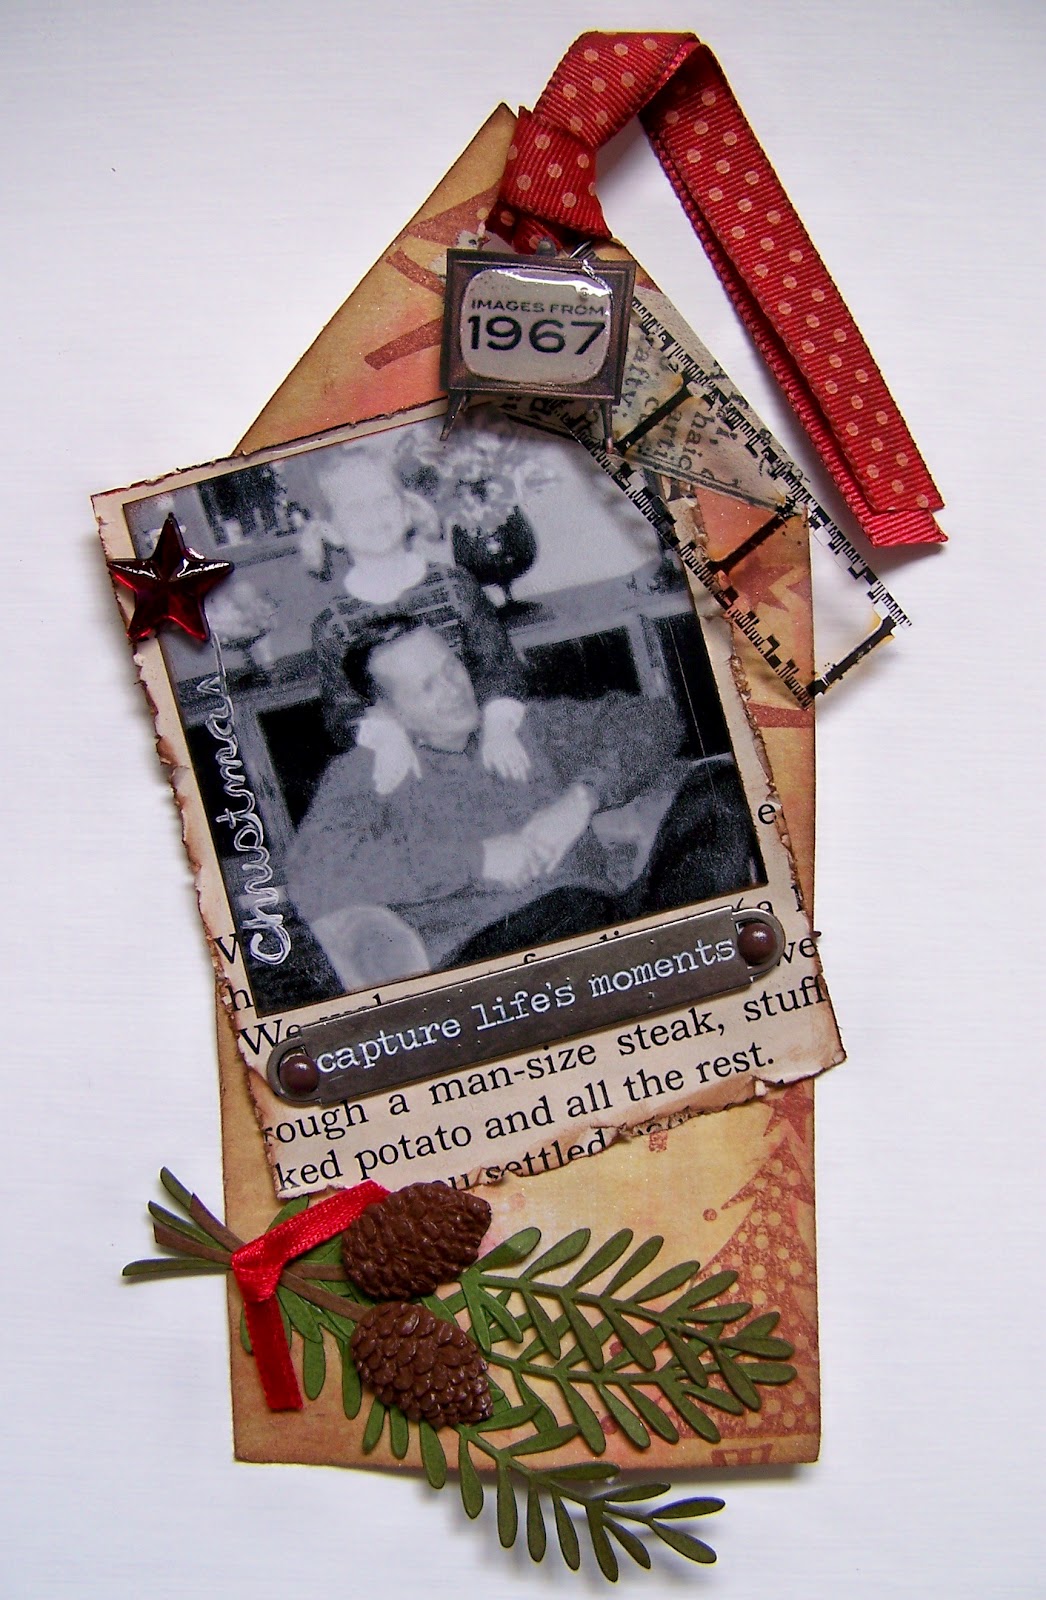
My favorite?...why the one I am currently working on, of course. At least that's the way I feel when working on any project. This one is no different, although some things have to grow on you a bit in order to become a favorite, take this tag for instance.It started off in a normal fashion, cutting the tag base and embossing it. I did get to use one of my new embossing folders which is just beautiful. I then used regular paint to cover the raised areas using my blending tool as Timmy advised. Then followed up with the 2 brown inks.

Cricut - tag- Don Juan cartridge ( 6" )
embossing folder- Sheena, heavy swirls
paint - Delta, Forest Green
Ranger - Distress inks- Antique Linen
Ranger's - Distress Ink ( reinker )- Brushed Corduroy

I really was not looking forward to making any flowers. As a rule, I don't like making them at all, and I have 2 cartridges just for flower making. You can imagine my disappointment when I learned that I stunk at flower making. :( Hoping that TH could change my flower making; I dutifully watched the the video, wishing it would spur on that moment of flower creativity and I admit I was intrigued about using the toothpick to base the flower's structure on. I still may not be a superb flower maker but the process was enjoyable anyway, and I will use this trick again, although I do confess that when I made my first one, I had to laugh because I thought.."oh,look, a tiny cute pink pine cone.."

flowers - Cricut - Flower Shoppe cartridge ( 3", 2.5", and 2" )
branches - French Manor cartridge ( 3" )
Ranger's - Distress inks - Worn Lipstick, Mowed Lawn
Tattered Angels - glimmer mist, Pearl
I altered the sentiment because I thought this one went better with my butterfly, and I made the butterfly dimensional along with the saying. I didn't have a frame stamp ( that wouldn't involve masking ) so I cut out my frame on the Cricut using a 2 sided tape applied to the card stock before I cut the image so that I could still emboss it easily. I also probably ruined the flowers by adding the inside color with alcohol inks, but lesson learned as they ended up being so bright.

butterfly stamp - Hero Arts
Cricut - frame - Happy Hauntings cartridge
sentiment - Karen Foster
Tim Holtz - alcohol inks - Watermelon, Citrus, and Sailboat Blue
embossing powder - American Crafts
I did substitute the pearls with a clear and black crystal, the pearls just looked too white. I also used a green ribbon because I think it balanced the color of the tag well.

crystals - old necklace from stash
key charm - Cousin
ribbon - stash

Really Reasonable Ribbon - #53 - Bling and Ribbon
Divas by design - Challenge 46 - Flowers

So I learned a few things, not to drop bright colors inside a muted toned flower! along with a new technique for making flowers. It's still my favorite, but then I am a fickle crafter and I know my next favorite is always right around the corner! ;)

And in my continuing endeavor to increase my TH stash I made my monthly purchase:
 And my goodies that Sheena sent me..because I was... and I am quoting her:  "being my first non UK commenter" ...lol..That was such a treat and I love her products too. I am looking forward to playing with all this treasure as soon as I can! She was very generous! :)

Thursday, July 5, 2012

digi: noun

digital picture from the internet
------------------------------------------------------------------------------------------------------------------------
Panpastel UK Challenge Blog: Challenge #25, use a digi
Perfect Sentiments Challenge: PSC39 Anything Goes w red, white, blue + sentiment
Unique Crafters Challenge #5 Patriotic


But it was fun! Of course I don't have all the TH products, this was purchase last month:

Had fun making the TH tag, while my canned air was out I also cleanned my lap top, so bonus! lol

I got a little carried away with the fireworks part, adding Tattered Angels spray mists to the alcohol inks :/ Since I didn't have the stuff TH used to get the silver effect I used Ranger silver stickles instead. I didn't have the charms or the metal number, but had a washer and a chipboard number, inked them in silver, added silver embossing powder which I then heat set. I added the word July to the washer with black Stazon ink. I used tin snips and some metal to cut out the star, then burnished down to the edges to make it "less dangerous! " :)


I was able to use the Ranger Alcohol Inks on the ribbon part of the tag, I wet the ribbon, scrunched it up and secured it with a paper clip before dotting it with the colors, was hoping for the same effect and was overall happy with it, although the heat gun could have melted the ribbon if I wasn't careful and I wasn't feeling brave enough at that time to see what the ribbon would end up looking like in a 'melted state'. lol

I didn't have the Statue of Liberty stamp but downloaded a digi which worked pretty close to his stamp I think:

Really Reasonable Ribbon twine
Really Reasonable Ribbon double ruffled ribbon
DCWV Neutral Stack ( white core )

I hope everyone had a wonderful July 4th!
------------------------------------------------------------------------------------------------------------------------

Project Pinterest July 9th

Saturday, June 9, 2012

nowadays: adverb

in the present, or in the times in which we are now living, usually in contrast to the past
--------------------------------------------------------------------------------------------------------------------
Well I did make some money from my garage sale and drove as fast as the law allowed to Michael's to spend it on more T!M HOLTZ stuff! lol This is what I got:
and I made his June tag, which coincided with what's going on in my life currently.
Let me explain:
Tomorrow I am driving down to South Carolina to finally bury my dad. I say finally because he actually passed away last August. He was cremated and his memorial is being held on Sunday. ( Don't even ask me for the details on why so late, loooooooooooong story. )

But I have been reminiscing all week about him and 2 weeks ago my cousin posted a picture taken of me and my dad back in 1967, so this June tag was perfect timing. I think because it meant so much to me that I had a really hard time making the tag. I printed the picture 6 times in all, ( the fifth time, things went flying across my craft desk, can we say bad temper? ) so the 6th time I decided to not try and color the picture itself and left it as is.


I did try and follow his other steps though.
And yes, since it was taken at Christmas I did add some red to it. I have an entire collection of old newspapers and magazines in a hope chest from my mom, and there was a magazine from the year 1967! Bonus! Since it had a damaged front cover, ( like as in none ), I didn't feel too bad cutting an article from it to use. I found this old airline ad where they talked about serving steak, baked potatoes etc. ( like wow, you really use to get such good service, not like nowadays, lol ) and since my dad was notorious for eating that meal every night, it just seemed fitting!


I also found this little TV with the year 1967, and just had to cut it out, and added some glossy accents to the screen part, isn't it cute?

--------------------------------------------------------------------------------------------------------------------

Project Pinterest
Begins on the 10th of every month, so join the party by linking up what you created from a pin that inspired you!
:)

Thursday, May 31, 2012

on the fly: idiom

 do things without preparation, responding to events as they happen
-----------------------------------------------------------------------------------------------------------------------
Finished my second T!M HOLTZ tag, the April one. I'm slowly catching up! yay!
I cut the bird and branch out with the Cricut French Manor cartridge using TH grunge board. Used his ink blending tool for the first time too! I can feel the love using this tool!
I used a left over scrap of grunge board to make the tag sentiment and the crown, inked it and embossed it and then stamped the saying.

Since Perfect Sentiments this week is allowing us to create any project as long as it has a sentiment on the front of it, I am going to enter this into their PSC34 Anything Goes With A Sentiment!
also
Die Cuttin Divas, Anything Goes Challenge!
--------------------------------------------------------------------------------------------------------------------------

Then a little art on the fly so to speak with Tracy Weinzapfel Monday night free online class. You can go here to see her video, she records them, and she put my creation up on her blog too! She is also having a monthly challenge to use the quote:
"let go of whatever holds you back
and no longer serves you
because you only get one shot in life"
unknown
I was experimenting with some of Elizabeth's background techniques too in preparation for working on my AB. You can go here, if you want to see all the different background techniques along with their tutorials, next one I am trying will be the saran wrap!
I began with a coat of gesso on card board and while the gesso was still wet I rolled a paper towel tube over it which gave me a nice texture. ( You know, the kind where you have that last sheet glued to the card board roll and you only get tatters if you try and pull it off? ) Then I painted a coat of yellow, again rolled the paper towel tube over it.
Then blotted blue paint and spritzed some blue Tattered Angel. Next we painted a heart with gesso, I added a spritz of purple Tattered Angel.
Next, painted the purple heart and added some glitter into the paint.  I also rolled the paper towel tube across the heart , I then outlined my hearts with black water color paint and spritzed it with water, held it up to let the drips run down the board.

Spritzed with black tattered Angels. Then outlined the edges and added the challenge quote, finished it off with a stamp "Live Life".

Hope everyone has a fantastic, artistic day!

--------------------------------------------------------------------------------------------------------------------------

Link up to our
In the hills of North Carolina